Lightning Components Basics, Creating A Dynamic Picklist.
Folks,
Today I will explain how I understand these components.
For a guy with an average IQ and little experience on Visualforce/ Apex, like I am, it is easy if we correlate lightning components with visualforce
Before we start, I recommend doing this exercise,
Please this:
https://developer.salesforce.com/docs/atlas.en-us.lightning.meta/lightning/qs_aotp_app_customobj.htm and also from Step 1 through Step 6.
https://developer.salesforce.com/docs/atlas.en-us.lightning.meta/lightning/qs_aotp_app_customobj.htm and also from Step 1 through Step 6.
If you understand that completely, you dont have
to go through the following reading. But If you dont understand it, I take it as
you are not very much familiar with Bootstrap, angularJS and importantly,
Callback functions.
The book says "The Framework uses an event-driven architecture
for better decoupling between components."
If you know javascript, you know events and
event-handling. But when I looked at the javascript they used in the ltng
components I got confused and didnt want to learn it at all, After some
research I understand why they did it that way that we really need to do the same way and also I learnt bootstrap and AngularJS and then came up with the theory in my last post. This is when I say, I was Force-ed to ;) learn all these things.
Lets take a moment here and understand this
stuff first. We really need to get the hang of callbacks as we depend on the server
responses to out javascript callouts.
W3Schools has a very good example to understand
the callbacks, here it is: http://www.w3schools.com/jquery/jquery_callback.asp
.
In simple words, the callback functions will be
executed after the effect of the previous code, not just the execution.
See the examples,
1) Example with Callback ,
http://www.w3schools.com/jquery/tryit.asp?filename=tryjquery_hide_callback ,
2)Example without Callback,
http://www.w3schools.com/jquery/tryit.asp?filename=tryjquery_hide_no_callback.
Did you notice the change in the effect? That is
what callback functions do. The code in the callback methods waits till the effect of the previous code
is completed and runs later as defined.
So When we make a callout to salesforce server like:
upsertExpense : function(component, expense, callback) {
var action = component.get("c.saveExpense");
action.setParams({
"expense": expense
});
if (callback) {
action.setCallback(this, callback);
}
The code in callback will be executed after the saveExpense() method in apex controller is finished. Thats all there is, and the rest is just a syntax.
Now, Lets build a simple component that displays a list of SObjects in the in a dropdown on a button click.
Step1: Create a ltng app to see the output:
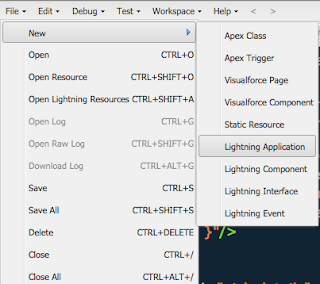
Open Console: File >> New >> Lightning Application.
I am naming it "learning".
Step 2: Create a ltng component.
File >> New >> Lightning Component.
I am naming it "objlist".
I want to keep a simple user experience here. The user will click a button and the list appears dynamically.
Step 3: Create an Apex controller to retrieve list.
File >> New >> Apex Class.
I am naming it "objlist_1_cmp_ctrl"
public class objlist_1_cmp_ctrl {
@AuraEnabled
public static List<String> getStringArray() {
String[] arrayItems = new String[]{};
for(Schema.SObjectType f : Schema.getGlobalDescribe().Values())
{
arrayItems.add(f.getDescribe().getLabel());
}
arrayItems.sort();
return arrayItems;
}
}
It returns list of strings, The labels of the SObjects, when called.
Step 4: Now we need, in the client side, the same string array to capture the response from the apex method.
So we will use <aura:attribute>. This is the way to tell the app container that this variable will be used in controller.js or helper.js and in turn they can modify the values of these variable making it dynamic.
We also need a picklist equivalent to <apex:selectList>, here, we have <ui:inputSelect > and a button.
So this is my component markup.
<aura:component controller="objlist_1_cmp_ctrl">
<ui:button label="Get Sobject list"/>
<br/>
<aura:attribute name="sobjects" type="String[]"/>
<ui:inputSelect >
<aura:iteration items="{!v.sobjects}" var="s">
<ui:inputSelectOption text="{!s}"/>
</aura:iteration>
</ui:inputSelect>
</aura:component>
We have < aura:iteration> which does the <apex:repeat> job here. Lets put this component in app and see what it looks like by putting our component in the app markup.
<aura:application >
<c:objlist />
</aura:application>
Click on the Preview button:
The output is:
Nothing happens when we click that button as we havent written anything on click.
Step 5: In visualforce we can write simple command button and an action and it takes care of the rest. But here we have to do it <apex:actionFunction> way. Remember, we write a javascript function and call this JS function from the button and then we will call the apex:actionFunction from the javascript. It is the same here.
So we will write a javascript function first. To write javascript, component controllers and helper js wrappers are given.
Open component, click "ctrl+shift+2" or
This will create objlistController.js, click on that tab.
({
getString : function(component, event) {
var action = component.get("c.getStringArray");
action.setCallback(this, function(response) {
var state = response.getState();
if (state === "SUCCESS") {
var stringItems = response.getReturnValue();
component.set("v.sobjects", stringItems);
}
});
$A.enqueueAction(action);
}
})
What we have here is simple javascript by the name "getString". Remember "getStringArray", its an apex method we created in Step 3.
Now if we need to catch the return value from apex method, we have to use the setCallback method, its predefined. And finally assign the returned value to our attribute " component.set("v.sobjects", stringItems); ".
Step 6: Change the button code to call this javascript.
<ui:button press="{!c.getString}" label="Get Sobject list"/>
Thats all there is... Now we will see the output again, by refreshing the page.
Now we get this after clicking the button:
Its simple, isnt it. If you dont think its simple, do it again. ;) :D
Hope This Helps,
Prabhan


Comments
Post a Comment